Resize and Save Images for Web to Publish on a Blog (Photoshop Basics)
 I have a serious pet peeve when it comes to images on blogs being an inconsistent or bizarre size. Especially when it interferes with the overall layout, breaking up the post in strange ways or creating the need for a side scroll. This is such an amateur mistake, and yet I see it on even experienced blogs all the time.
Resizing images for a blog is incredibly easy, especially when you have Photoshop. There is no excuse for not creating a routine size and organization system for every picture that ends up on your blog. It looks better, it makes it easier to see posts on a mobile device and it takes away a look of inexperience that can reflect badly on your site.
There is an additional benefit to this process. That is maintaining the clarity and resolution of a photo, despite resizing either up or down. Photoshop will keep you from ending up with a grainy, blurry or otherwise damaged image by the time you are done resizing.
You will be glad to know that the steps are incredibly simple:
1. Choose Your Standard Size
You want all images to be consistent on your blog. I usually do this by having different tiers for different purposes. Tier I images are used for post headers, and are usually smaller since they are above the post cut and so load automatically for everyone visiting. These I keep around 470 x 350, and center them when they are posted. But for images under cuts, I allow for bigger photos.
I keep the Tier II photos at around 600 x 400. This is a manageable size that should keep you from having to adjust the scroll when you move down the page. As for Tier III, these are the thumbnails I use for consistent links offered through my main page. I try to keep them at 150 x 150, so they stack easily, take up little space but can still be seen clearly. Having the three tiers makes it easy to organize, as I just specify which category it is in at the time of uploading the file.
2. Resize Images Accordingly
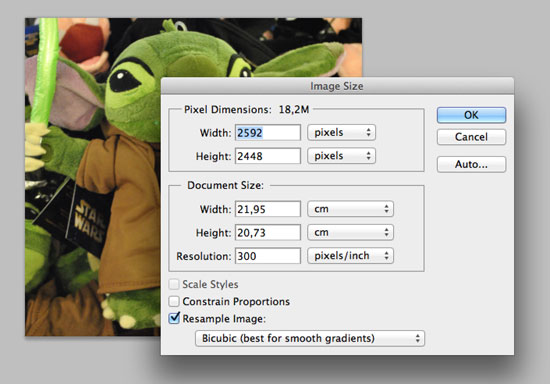
Resizing in Photoshop is very fast and simple to do. Open up the photo in the program. Then go to the header and select Image > Image Size. This will bring up a small utility box, which will allow you to select the sizes by pixel or document. I would suggest doing so by pixel, and the rest should auto complete for you. Just put in the correct Width and Height, and change anything you like to your specifications. However, I always use Bicubic as it has the smoothest gradient quality and so is better for photos. Once you are done, hit OK
3. Sharpen The Image
You might notice at this point that there are some subtle changes to the resolution of the image. Maybe there is just a bit of blurring, or it doesn’t appear as sharp to the eye as it did before. Luckily, this is a quick fix.
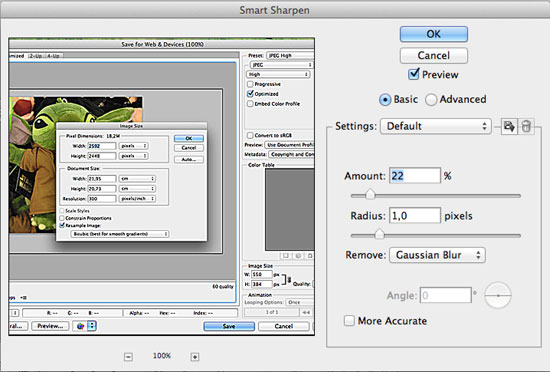
Go to the header and select Layer, then create a new layer. Or just hit CTRL-J to create one. You should see Layer 1 over Background in the image box at the corner right hand side. Make sure it is selected, then go to the header once more and select Filter > Sharpen > Smart Sharpen. This will allow you to select the amount of sharpness, and the radius. Start off slow, with 40% to 0.2, then progressively make your way up until it has the crisp look you were wanting. Most will end up somewhere around 60% to 0.4, but the amount of blurring may make it necessary increase this by as much as 20%.
4. Save Image For Web
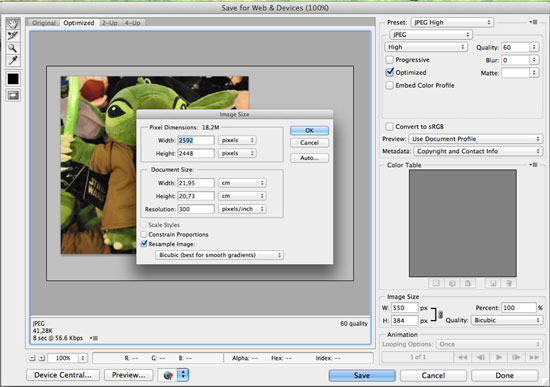
When you save an image and then put it online, it can sometimes not be compatible and mess with the edits you made to the picture. So make sure when you save that you hit File > Save for Web & Devices. This will bring up a utility box that lets you save the image in whatever form you choose (probably JPEG), and select the image quality. I always save it at 80%, though this makes the load time a little longer. Anything over 50% is usually pretty good. You should also make sure your image name is something easily searchable, so use keywords! Preferably those that will also be used as tags for your post.
See? Just four steps to having a well organized, standard image blog. You will be surprised by how much better it looks when you use a uniform format for photos.
 Use our free gallery to choose a photo for your next blog post: Smart Photo Stock